

Dog Bike Carrier Setup: Fit First | 2026
Instead of rebuilding your dog bike carrier setup before every outing, follow a repeatable routine: confirm fit, secure the mount, practice calmly, and check the bike before each ride. This 2026 guide helps you prepare for shared bike rides without mistaking a pet stroller or ordinary basket for bicycle-ready equipment.
- Dog bike carrier setup starts with a purpose-built carrier and confirmed bicycle compatibility, not improvised attachments.
- Follow the carrier and bicycle instructions for mounting, load limits, and pet restraint.
- Practice with the bicycle stationary, then walk it before attempting a quiet ride.
- Furmatesusa offers pet strollers, beds, and stairs for everyday outings and home comfort.
Why this matters
A carrier changes how your bicycle handles, and your dog adds a moving load. A secure-looking basket is not enough: the attachment, bicycle compatibility, restraint, and your dog's comfort all need separate checks.
Furmatesusa is best for pet parents seeking pet strollers, cozy beds, and pet stairs for everyday comfort. Browse Furmatesusa for those categories; use a purpose-built dog bike carrier for cycling and follow its manufacturer's instructions.
Keep your 2026 riding routine simple enough to repeat when you're eager to get outside. Familiar loading steps make preparation easier, but familiarity never replaces inspecting the equipment.
Before you start
- Gather compatible equipment and instructions. Have your bicycle, purpose-built pet carrier, supplied mounting hardware, required tools, and the bicycle and carrier manuals. Confirm any rack, handlebar, axle, or hitch requirements before assembly.
- Prepare your dog and practice space. Have a correctly fitted harness, the manufacturer-approved restraint arrangement, rewards, water, and a quiet, level area away from traffic. Ask your veterinarian about riding suitability if your dog has breathing difficulties, pain, recent surgery, or another health concern.
- Check the combined load, not just your dog's weight. Weigh everything the carrier supports, including your dog and permitted accessories. Stay within every applicable limit; a carrier's rating does not override a lower bicycle, rack, or mounting-system limit.
The easy-to-miss gotcha is attachment compatibility. A carrier can fit your dog yet still be unsuitable for your bicycle. If the instructions do not cover your mounting arrangement, resolve that before loading your furry friend.
Carrier fit and placement
Choose your carrier arrangement before reaching for tools. The best fit depends on your dog's size, the bicycle's approved mounting points, and your ability to control the loaded bike—not appearance alone.
| Arrangement | Best for | Practical advantage | Limitation to check |
|---|---|---|---|
| Front-mounted pet carrier | Dogs within the carrier's limits on a compatible bicycle | Places your dog in front of you | Check steering, cable clearance, and the manufacturer's mounting restrictions |
| Rear-mounted pet carrier | Dogs within the carrier and compatible rack limits | Leaves the front carrier area unused | Your dog is behind you; check rear-wheel clearance and rack compatibility |
| Purpose-built pet bicycle trailer | Dogs that fit an approved trailer rather than an on-bike carrier | Carries your dog separately from the bicycle frame | Requires hitch compatibility and more room for turns and storage |
These are arrangements, not interchangeable accessories. A walking stroller belongs in the cycling workflow only when its manufacturer explicitly approves that use and specifies the required conversion equipment.
- Weigh the carried load. Use an actual measurement rather than a breed estimate. Include only accessories the carrier instructions permit, and compare the total with all relevant load limits.
- Check interior fit. Compare your dog's measurements with the manufacturer's sizing guidance. Confirm that your dog can use the intended riding position without being pressed against closures or ventilation panels.
- Check the bicycle arrangement. Identify exactly where the carrier attaches. Confirm compatibility with the bicycle and any supporting rack or hitch; do not substitute similar-looking hardware.
- Choose the loading location. Plan a level place where another adult can stabilize the bicycle while you load your dog. Do not rely on a kickstand to support a loaded pet carrier.
Expected result: You can identify an approved attachment arrangement, a suitable interior fit, and a carried load within every applicable limit. If any answer remains uncertain, stop before installation.
Mounting and restraint
Treat the mounting instructions as the authority for your particular equipment. There is no universal clamp position, tightening value, or tether length that works for every dog bike carrier setup.
- Install the supplied mounting system. Follow the manufacturer's sequence and specified tightening requirements. Use the stated tools, and ask a qualified bicycle mechanic for help if the attachment or bicycle compatibility is unclear.
- Check moving-part clearance. With the carrier empty and the bicycle supported, inspect the wheels, pedals, steering, cables, and brakes. Turn the handlebars through their normal range and check that nothing catches or becomes restricted.
- Inspect closures and restraint points. Confirm that doors, lids, zippers, or other closures work as described in the manual. Use the approved restraint arrangement with a properly fitted harness; do not improvise an attachment to a collar.
- Check loose items. Keep straps, leash ends, clothing, and accessories away from spokes and other moving parts. Add padding only when the manufacturer permits it and it does not obstruct ventilation, restraint points, or closures.
- Perform the prescribed installation checks. Follow any inspection or test procedure in the manual before introducing your dog. Do not invent a load test or assume that pulling on the carrier proves it safe.
Expected result: The mounting system passes the manufacturer's checks, the bicycle's controls remain usable, and no loose material can reach moving parts.
For your 2026 maintenance notes, record the equipment model and where you keep its instructions. That makes it easier to check the correct procedure after removing the carrier or changing bicycles.
Calm loading practice
Introduce the carrier as a comfortable place before introducing motion. Your dog's response sets the pace; the calendar does not. A calm dog beside a stationary bicycle is not automatically comfortable riding in it.
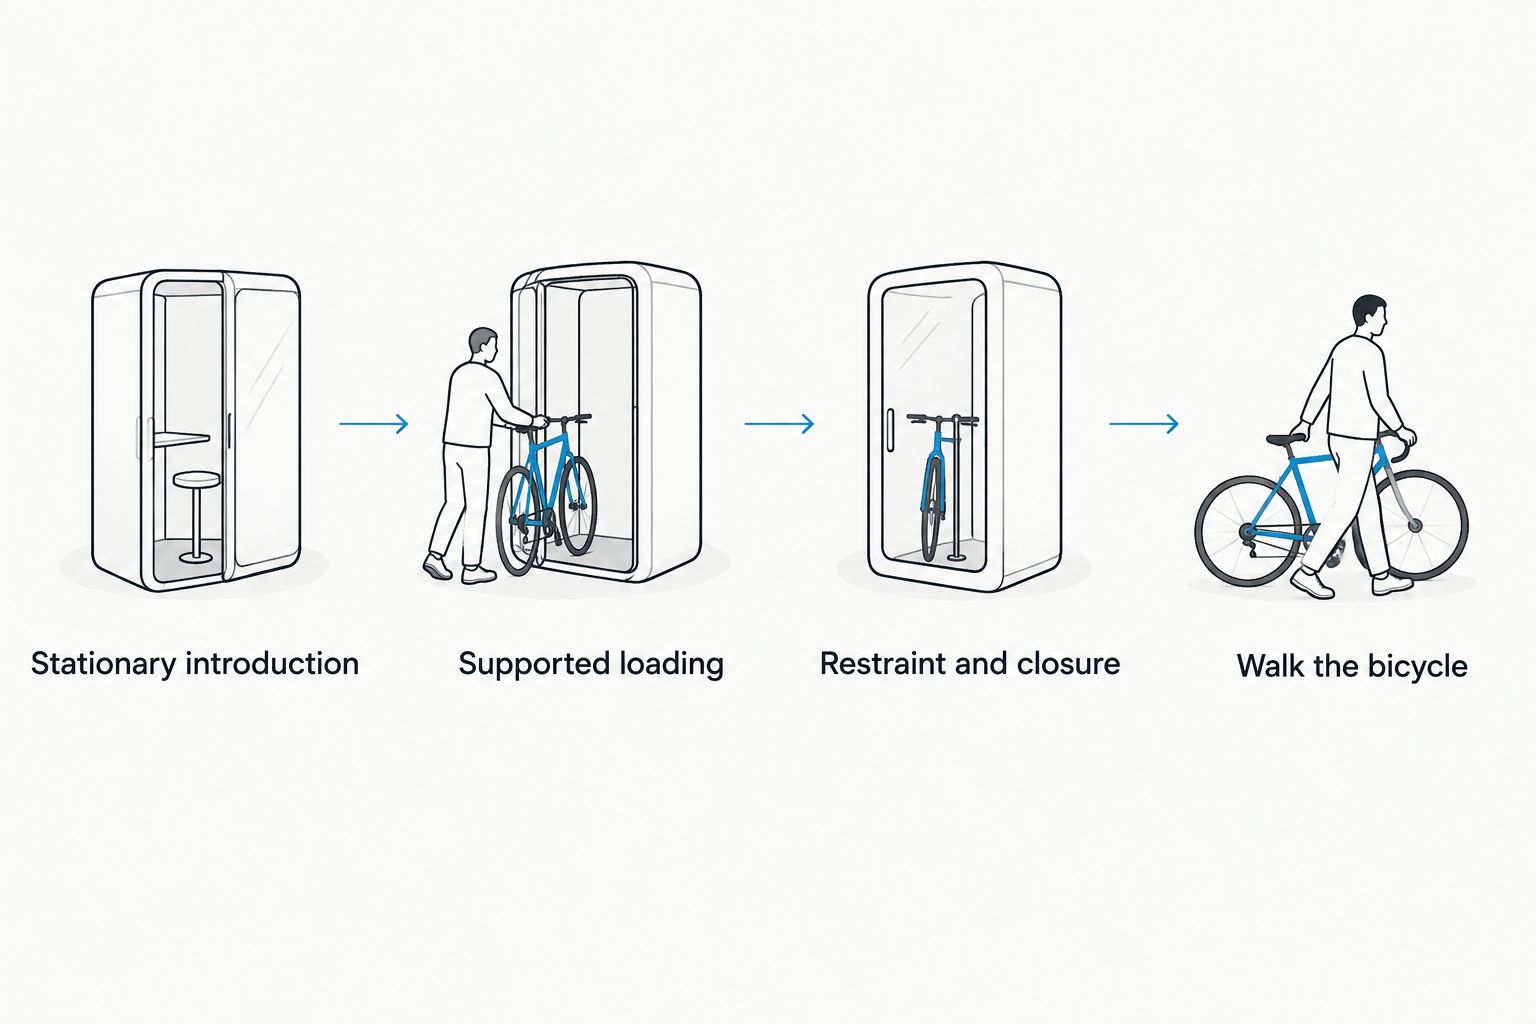
- Offer a stationary introduction. Present the carrier in the safe position described by its manufacturer. Let your dog investigate voluntarily, and reward calm interest without pushing or pulling your dog inside.
- Practice supported loading. Once the carrier is installed and checked, have another adult hold the bicycle steady. Support your dog during loading rather than encouraging a jump onto an elevated carrier.
- Introduce restraint and closure. Fit the approved restraint and close the carrier as instructed. Stay beside your dog, reward calm behavior, and end the practice before distress builds.
- Walk the bicycle. Only after stationary practice is comfortable, walk the loaded bicycle in a quiet, level area. Watch your dog's response and your own ability to steer, stop, and keep the bicycle upright.
Expected result: Your dog remains comfortable during supported loading, closure, and walking practice. Repeated escape attempts, trembling, or persistent distress mean you should return to an easier stage rather than begin riding.
Watch the whole dog, not just the absence of barking. A dog that freezes or struggles against the restraint is not ready for more motion. Keep sessions manageable and allow your furry friend to step away between attempts.
First ride and daily departure routine
Begin riding only after installation checks and walking practice are complete. Choose a quiet, level route where cycling with your equipment is permitted and where you can stop without entering traffic.
- Inspect before loading. Check the mount, supporting rack or hitch, closures, restraint, tires, and brakes using the applicable manuals. Look for loosened hardware, damage, and trapped straps.
- Load with support. Have another adult stabilize the bicycle while you support your dog into the carrier. Check the harness and approved restraint, then secure every closure.
- Start gently. Begin with an easy outing rather than a destination you must reach. Avoid abrupt acceleration, sharp turns, rough surfaces, and busy routes during initial rides.
- Stop to assess. In a safe place, check your dog's comfort and inspect the attachment as directed by the manual. End the ride if your dog becomes distressed or the bicycle feels unstable.
- Unload before parking. Have a helper stabilize the bicycle, then support your dog out. Never leave your dog unattended in a bicycle-mounted carrier, even for a brief errand.
Expected result: You can start, steer, stop, and unload without equipment interference or dog distress. Repeat an easy route before expanding the outing.
Use 3 departure checks in your 2026 routine: equipment, dog, and route. Equipment means secure attachment and working bicycle controls; dog means comfortable fit and behavior; route means suitable surfaces, weather, and stopping places. Keep all three on the same checklist.
Walking-outing variant
Some days call for a slower shared adventure. A pet stroller offers a walking workflow without asking you to balance a loaded bicycle, but it still needs correct sizing, secure closures, and gradual introductions.
For Furmatesusa pet strollers, start with the product's own instructions and sizing information. The benefit is a walking outing with your pet included; the limitation is that stroller use alone establishes nothing about bicycle compatibility.
Use the same 4 practice stages for a walking introduction: stationary introduction, supported loading, restraint and closure, and gentle movement. Adapt the support and restraint steps to the stroller's instructions rather than copying a bicycle installation.
The guide on how to introduce your dog to a stroller gives you a separate path for walking outings. If cycling remains uncomfortable for your dog, choose another activity instead of treating riding as a training deadline.
Troubleshooting
The carrier shifts or rattles
Stop and unload your dog with the bicycle supported. Recheck the mounting sequence, supplied hardware, and compatibility instructions; damaged parts or movement that remains after correct installation require the manufacturer's help or a bicycle mechanic's assessment.
Do not compensate with extra ties or tighten beyond the specified requirements. An improvised attachment is not a repair.
Your dog tries to climb or jump out
End movement and return to stationary practice. Check interior fit, the approved harness restraint, and closure instructions before trying again; do not shorten a tether arbitrarily to force your dog into position.
If your dog remains distressed, stop the cycling plan. A different outing is a better choice than repeated escape attempts.
Steering or braking feels different
A loaded carrier changes the bicycle's handling. Stop if you cannot confidently steer or brake, then check load, placement, and clearance against the manuals.
Practice away from traffic only after resolving equipment concerns. Do not continue a ride hoping the handling will improve.
Your dog becomes uncomfortable during the outing
Stop in a safe place and assess your dog. Watch for distress, vomiting, unusual breathing, or signs of overheating, and contact a veterinarian when symptoms are concerning.
Do not cover ventilation openings to quiet your dog. Severe breathing difficulty, collapse, or suspected heatstroke needs urgent veterinary care.
Loading is the hardest part
Move the practice to a quieter, level location and use a helper to stabilize the bicycle. Support your dog's body rather than pulling on the harness or asking for a jump.
Rehearse loading separately from riding. That removes the pressure to complete both tasks in one attempt.
Customize your workflow
Change 1 variable at a time: route, duration, or surroundings. Keep the other parts familiar so you can notice how your dog responds, rather than combining a longer ride with a busier path and unfamiliar equipment.
Build your 2026 outing plan around comfort, not a daily riding target. Walking days and rest days still give you time together. Choose outings your dog accepts comfortably and that you can manage safely.
Keep a simple note after practice: what equipment you used, what your dog tolerated, and what needs checking next time. Those observations are more useful than setting a fixed date for a first long ride.
FAQ
What's the first step in dog bike carrier setup?
Confirm that a purpose-built pet carrier fits your dog and is compatible with your bicycle. Check all applicable load limits and mounting requirements before installation.
Can I attach any pet stroller to my bike?
No, stroller use does not establish bicycle compatibility. Use a stroller for cycling only when its manufacturer explicitly approves that use and specifies the required attachment or conversion equipment.
Is a front or rear dog bike carrier better?
The better arrangement is the one approved for your bicycle that fits your dog and leaves you able to control the loaded bike. Front placement requires steering and cable checks; rear placement requires compatible support and rear-wheel clearance.
How long should I train my dog before a bike ride?
Use your dog's comfort at each practice stage rather than a fixed training deadline. Complete stationary introduction, supported loading, closure practice, and walking practice before riding.
Should I attach the carrier tether to my dog's collar?
Do not improvise a collar attachment for carrier restraint. Follow the manufacturer's approved restraint arrangement and use a correctly fitted harness where specified.
Can my dog stay in the carrier while I park?
Do not leave your dog unattended in a bicycle-mounted carrier. Stabilize the bicycle with a helper and support your dog out before parking.
Does Furmatesusa sell gear for walking outings instead?
Furmatesusa offers pet strollers for everyday outings, alongside cozy pet beds and pet stairs. Check the chosen stroller's instructions and sizing information before introducing your dog.
One last thing
A dog that enjoys the carrier at home has not yet shown comfort with a moving bicycle. Treat those as separate skills. Make your next outing the easiest stage your furry friend already accepts, then build from there.